

Eclipse Plug-in |
UniMod Plug-in for Eclipse Installation
- Download and install JDK 1.4.x.
- Download and install Eclipse Platform 3.x.
- Download and install GEF 3.x plug-in for Eclipse.
- Download latest version of UniMod plug-in for Eclipse (you need file com.evelopers.unimod.plugin.eclipse_XX.XX.XXX.zip where XX.XX.XXX - version number, choose the latest one).
- Install UniMod plug-in: unzip downloaded zip file into Eclipse/plugins directory and restart Eclipse.
- See application development process presentation for further instructions.
Samples Installation
After UniMod plug-in installation you can import sample projects supplied with UniMod.
-
Start Eclipse.
NoteSpecify JDK in command line if you have more then one JDK installed on you computer.
ECLIPSE_HOME/eclipse.exe -vm JAVA_HOME\bin\javaw.exe
- Select [File/Import] to open import wizard dialog.
- Select item [Existing Project into Workspace]
- Browse to folder [UNIMOD_HOME/Samples/<sample_folder>]
- Press [Finish] button
UniMod Plug-in User Interface
UniMod Perspective
Perspective in Eclipse is a predefined layout of editor and different views. UniMod plug-in defines its own perspective. To select UniMod perspective open perspective selection dialog [Window/Open Perspective/Other...].
- UniMod editor
-
Every UniMod model consists of one Connectivity Diagram and zero or more Statechart Diagrams. At the bottom of the editor you can see tabs. Tabs are used to switch between diagrams. New Statechart diagram appears when you add new state machine to connectivity diagram and disappears when you delete state machine.
-
Package Explorer

-
Is used for resources manipulation. Package explorer is a part of Java Development Tools plug-in. It is included in UniMod perspective instead of standard Navigator view because currently UniMod plug-in is more like to be used with Java. And Package Explorer is very comfortable for Java code browsing.
-
Palette view

-
Palette contains diagram-editing tools. If you close palette view, palette will appear as a toolbar in the UniMod editor.
-
Outline view

-
When UniMod editor is active, tree representation of entire model is shown in Outline view. Outline view is destined to browse model.
-
Properties view

-
You can see and edit properties for currently selected element in this view. Note that most of properties may be edited directly on diagram by double clicking on them (direct edit). Some properties (e.g. figures positions and sizes are marked as advanced). To see these properties press button
 at the top of Properties view.
-
Problems view

-
All errors and warnings found in opened projects are shown in this view. UniMod plug-in specifies its own set of problems.

Main Menu
UniMod plug-in adds some specific items to the main menu.
-
View >> Zoom in
 and
View >> Zoom out
and
View >> Zoom out

-
These items allow controlling zoom factor for currently selected diagram in UniMod editor.
-
View >> Grid

-
Selection of this item toggles grid for all UniMod diagrams. When grid is turned on it is shown on the diagrams and all figures are snapped to it. The value of grid status (turned on or off) is persistent property of UniMod plug-in. It means that it is saved with Eclipse workspace settings.
-
View >> Snap to geometry

-
When this item is turned on figures are snapped to each other. If figure's bounds match bounds of another figure to provide a feedback blue line will appears. Snap to geometry also is a persistent setting.
-
View >> Layout diagram

-
Selection of this item forces diagram layout. Currently it works only for Statechart diagram.
-
View >> Validate statechart

-
This item forces model validation. It is rarely used because plug-in validates the model in a background on every model change automatically.

Tool Bar
Some actions are associated with buttons in tool bar.
-
Undo
 and Redo

-
UniMod plug-in supports standard mechanism of undoing and redoing of changes to model.
-
Layout diagram
-
This button is just a shortcut to menu item described earlier.
-
Validate statechart
-
The button is also a shortcut to menu item described earlier.
- Zoom
-
Combo box where zoom factor for a UniMod diagram could be selected.

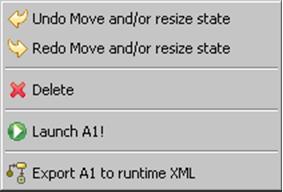
Context Menu
Content of context menu (as following from its name) depends on currently selected element.
-
Undo
and Redo
-
UniMod plug-in supports standard mechanism of undoing and redoing of model changes.
-
Delete

-
Deletes selected element from model.
-
Launch

-
Launches currently selected state machine using standalone interpreter.
-
Export to runtime XML

-
This item starts an export wizard. Using it you can create model XML-description for further runtime execution.
Wizards
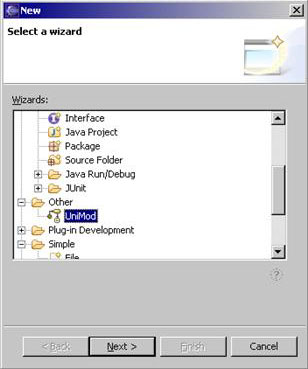
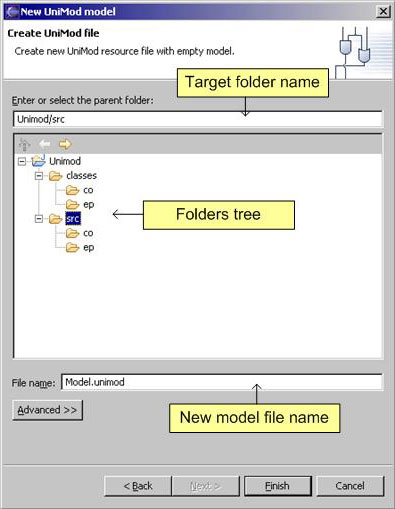
UniMod New Wizard
To create new UniMod model wizard should be used. To open new wizard selection dialog choose [File>>New>>Other...] in main menu. There it is possible to select UniMod new wizard [Other>>UniMod]. On the new UniMod model page you should specify folder and file for empty model creation.
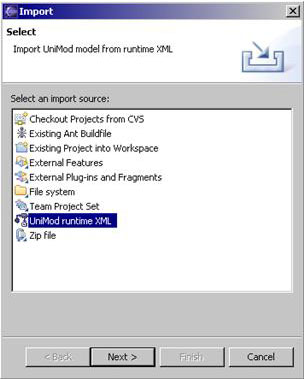
UniMod Import from Runtime XML Wizard
UniMod plug-in can create new model using model XML-description. To invoke this feature open select import wizard dialog [File>>Import...]. Select [UniMod runtime XML] there. Choose XML file to import. Choose folder and file that will contain imported model.


UniMod Export to Runtime XML Wizard
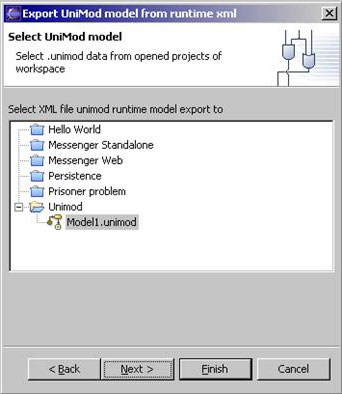
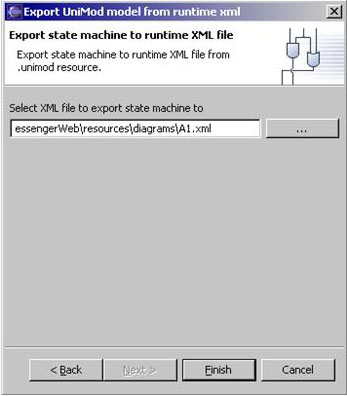
To use designed UniMod model during runtime you should export it into XML format. To do so start export wizard selection dialog [File>>Export...]. Select [UniMod runtime XML]. Select model that you want to export. Select state machine in the model considered being root. Select path to target XML file.


